The false coloring and zebra tools are useful for assessing tonal levels within different regions of an image. This reveals exactly where there are potential problems, and can make it easier to adjust the lighting or camera settings accordingly. In this article, we'll discuss how to use these tools to improve video output and exposure.
For a background, refer to the articles on exposure strategy with RED cameras and the in-camera histogram, goal post and traffic light tools.
OVERVIEW
With RED®, available tools include the exposure, video and zebra modes. When activated, these appear as colors which are superimposed onto a monochrome version of the original scene (with video and exposure modes), or as overlaid stripes on a standard full color image (with zebra mode). Where this appears is based on one of two different measures:
Monitor RGB or IRE* values. This is a relative scale based on the output range sent to a display, and does not necessarily reflect lightness values in the digital file. It's most useful when assessing direct output via HD-SDI, or whether the current ISO and "look" are a good starting point for post-production.
RAW data values. This is an absolute scale based on the capture capabilities of a given camera sensor, and does not necessarily reflect brightness in the viewable image. It's most useful when trying to optimize exposure and post-production potential.

IRE is a way of quantifying tones relative to the total output range of a device, independent of characteristics such as contrast ratio or output brightness. With RED cameras, 0 and 100 IRE correspond with black and white, respectively.
EXPOSURE MODE
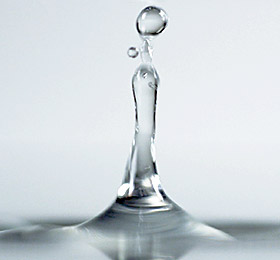
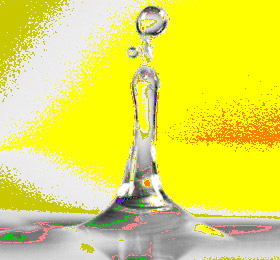
Exposure false color mode can be enabled within the menu system via "Settings > Display > Tools > Exposure." When activated, most of the tonal range will appear in monochrome, and an E✓ indicator will appear below the image in the LCD status bar. Purple and red are the equivalent of the left and right goal post tools from the image histogram:


Note: The above false colors will appear in the same location regardless of ISO or look setting. To change these, one must alter the amount of light entering the camera (by adjusting lighting, shutter speed or lens aperture).
Unlike the goal posts though, false color is able to indicate exactly which highlights or shadows are problematic. If red is overlaid within the subject of interest, or anywhere except lights and direct reflections, then the image is very likely overexposed. If there aren't any red overlays, then the exposure is likely OK and could even be increased. If purple is overlaid on key image detail that isn't in the shadows, then the scene is likely underexposed.
VIDEO MODE
Video false color mode can be enabled via "Settings > Display > Tools > Video" and a V✓ indicator will appear at the bottom of the LCD when activated. Some also refer to this as the "predator mode" due to the sheer number of false color bands.


Note: Under most shooting scenarios, the above purple indicator is unlikely to appear, since FLUT™ color science protects against crushed shadows. Also, for best results, video mode should be viewed at or above ISO 800.
Green is where you will want 18% gray, pink is typically the brightness of Caucasian skin tones, straw/yellow/orange are strong highlights and increasingly closer to white, teal is deep shadows and blue is on the verge of becoming textureless black. In general, pink and green are most helpful when calibrating based on a known reference, whereas the other colors indicate the extremes of a tonal range.
A potential disadvantage of video mode is that all the false colors can distract from the underlying preview. Many therefore prefer to only use this mode during initial set-up, whereas exposure mode can often remain enabled under a wider range of scenarios.
ZEBRA MODE
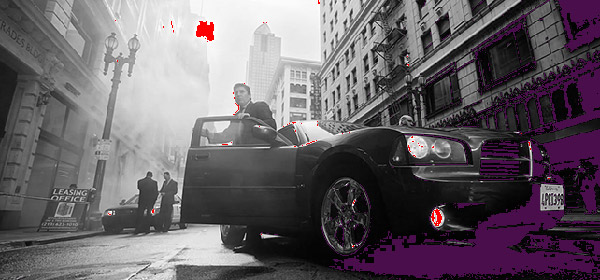
Zebra is a specialty mode that is capable of showing up to two customized overlays with arbitrary IRE ranges. This can be enabled via "Settings > Display > Zebra" in the top menu. Unlike the other two modes, zebra indicators appear as diagonal stripes, are fully configurable, and have the advantage of preserving a full-color base image:


Note: Above example is intentionally overexposed to show how zebra indicators don't distinguish between clipped and non-clipped tones. Exposure mode would have shown red false coloring on the stone, for example.
With traditional video cameras, many used a single zebra to indicate highlight detail. It would often be set at 70% (70*IRE with RED), in part because this is where a white piece of paper would begin to have minimal texture when rendered using a typical contrast curve. Skin tones or skies would be exposed to appear just darker or brighter than these lines. If enabled, a second zebra would typically indicate either mid-tones or shadows. In the example above, the second indicator is shown for the deep shadows (below 10% intensity or 10*IRE), and the first indicator has been set to highlights above 85*IRE.
However, as with other IRE-based modes, zebra mode is only applicable for the current ISO and look settings (such as with HD-SDI output) „ not for the raw image data. If anything is changed in post-production, the indicators won't be representative of the final output tones. In those situations, zebra mode is therefore more of a preview and output brightness tool than an exposure tool.
IN PRACTICE
First, in exposure mode, use the purple and red indicators to adjust your lighting or lens aperture. The strategy is usually to achieve an optimal balance between clipping from overexposure and image noise from underexposure. With most scenes, one often has a surprising range of exposure latitude before excessive red or purple indicators begin to appear.
Then if necessary, in video or zebra mode, use the other tonal indicators to fine-tune how the scene will appear via HD-SDI, or to adjust your suggested look when sending footage for post-production. The zebra and video modes are also an objective way to assess LCD preview brightness under varied ambient light.
RELATED TOPICS
- Part 1 of this tutorial: Exposure Strategy with RED Cameras.
- Part 2 of this tutorial: In-Camera Histogram, Goal Post & Traffic Light Tools.